Can I tell you how excited I am about this new project I just finished! (This is Melissa writing this week by the way.) I have been trying to figure out how we are going to travel and live in a small space with 3 kiddos (since we are moving into a 5th wheel soon),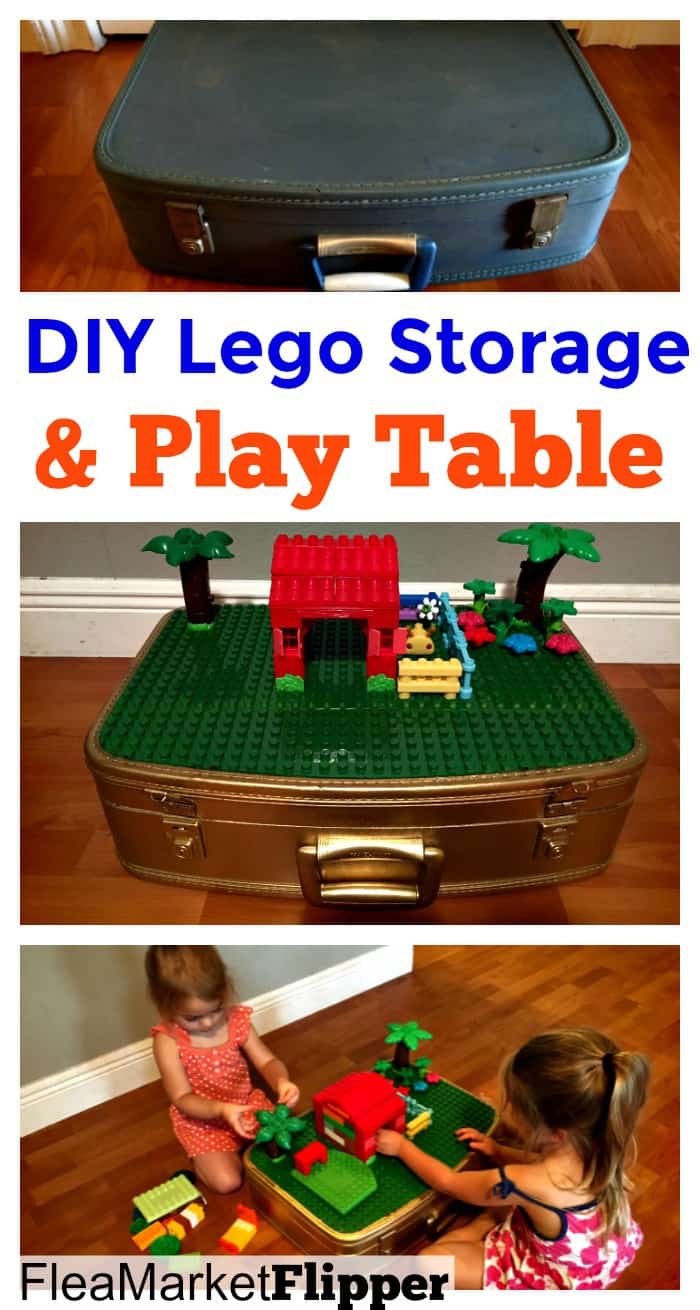 and still let them have some of their toys. I really wanted to bring some of our Duplo
![]() legos because they like to build things and I want to encourage more play and pretending and less watching TV when possible. I really was trying hard to find some good lego storage/play table options.
legos because they like to build things and I want to encourage more play and pretending and less watching TV when possible. I really was trying hard to find some good lego storage/play table options.
I know how much of a mess these legos can be, so I wanted to bring a small amount of them and keep them contained somehow. I was trying to figure out how to do a lego table that had storage in it, but also folded up nicely. Pinterest didn’t have exactly what I was looking for either. Last Saturday we were at the flea market for our weekly flea market hunt, and I came across this awesome suitcase. You can check out the FB live we did from the flea market HERE.
DIY Lego Storage
This post may contain affiliate links. Please see our full disclosure for more details.
It may just look like a simple old suitcase but it was perfect for what we needed!

Clean
I had to clean it a little first. It had that musty smell on the inside. I used an Enzyme Spray![]() that I had on hand (from Nature’s Sunshine
that I had on hand (from Nature’s Sunshine![]() ) Sprayed it down, let it sit for a few minutes, and then wiped it out. You could probably use a vinegar solution as well and wipe it out.
) Sprayed it down, let it sit for a few minutes, and then wiped it out. You could probably use a vinegar solution as well and wipe it out.
Paint
Next came the paint. This part was a bit exciting and also overwhelming at the same time. Deciding on a color to use was tough when you have the whole rainbow available to you. As I was walking down the paint aisle at Wal-Mart, something about a gold glitter paint called my name. I thought the girls would love it! Well, the glitter paint turned out to be a flop. We took back two cans of glitter paint before deciding it was a no-go.
Robbie had a can of gold paint![]() in his garage, so I went ahead and tried it, and loved the way it turned out! We had to buy one more can of paint because he didn’t have enough to finish covering it.
in his garage, so I went ahead and tried it, and loved the way it turned out! We had to buy one more can of paint because he didn’t have enough to finish covering it.
Next was the top piece. I wanted to glue on a Duplo base![]() to the top of the suitcase, but I couldn’t find one anywhere! I had one piece already, but needed one more to make it cover properly. After posting in a yard sale Facebook group that I was looking for one, a friend responded she had two! Yay!
to the top of the suitcase, but I couldn’t find one anywhere! I had one piece already, but needed one more to make it cover properly. After posting in a yard sale Facebook group that I was looking for one, a friend responded she had two! Yay!
Cut
So now I had two pieces that were the same size, but not the same color. They needed to be cut and then painted.
Paint Take 2
After they were cut it was time for paint. I picked out ‘John Deere Green’![]() for the paint. Love the green color! You can’t go wrong with John Deere anything. 😉
for the paint. Love the green color! You can’t go wrong with John Deere anything. 😉
Glue
Once everything dried, it was time to glue the pieces on. You could use many kinds of adhesive. I used liquid nails because that is what Robbie had in his garage. 
Play
The minute the kids saw the new lego storage home, they wanted to play with it! It’s always so funny to me when they re-discover toys. These Duplo legos have been sitting in little guys room for MONTHS and they have only played with them a handful of times. Now they are in a new container with a new base, and bam! Play time.

After they played with these long enough for me to get pictures, I packed them up and am planning to put them away until the trip. It’s always so much more fun to find toys again after a month or so of missing them.

One downside of this lego storage suitcase is that all the legos have to be dumped out before they can be played with. But the reality is that the kids always dump out all the legos when they play with them anyways, so it really works out fine.
This lego storage suitcase should be perfect for our travels. We can only bring a limited amount of legos, they can all be easily stored and put away, and it has it’s own play table. Win/win/win!
Total Cost
Suitcase – $3
Duplo Base – $4
Gold Spray Paint – $4
John Deere Green Spray Paint – $6
Total cost – $17
Time to complete – 2 hours (could be less if your paint dries faster)
If you are looking into flipping items for profit, check out our PDF download of our best places to get items to flip. (This will also subscribe you to our e-mail list of flea market flips and eBay tips. You can unsubscribe anytime)
We Want To Hear From YOU!
What is your favorite Flea Market /Thrift Store DIY that you have done lately?
Related Posts
10 DIY Furniture Flips on a Budget
How I made $5,229 in One Month of Flipping Flea Market Items
How a Stay at Home Mom Made $450 in Two Days of Flipping Flea Market Items
Love your idea of Lego storage, Robert!
My kids definitely would love a play case like this. Some DIY playing ideas take me a lot of time. I think the project will be faster to make
Thanks Mark!
Brittany, the Duplo’s are specifically designed for the younger child. You should look for some
Duplo parts & pieces to get your daughter started. I have seen them often in the “FREE” pile
nearing the close time at yard sales.
Such a great idea and something I would love to do also! Great job Robert!
thanks!
This is great! I’m 90% sure there’s a suitcase just like your’s in my grandpa’s basement.
I also have an end table Lego project I found on Pinterest. What kid doesn’t like L EGO’s? Heck, I still own a tun of them. LOL
Thanks for the idea!!
You’re welcome Catherine! My kids LOVE playing with these! And they can put them away easy too.
Very cool! I’m thinking you can find a small plastic tote that fit in the suitcase, so you don’t have to dump them out!
Great idea Christy! thanks!
I love the Lego storage/play case
Thanks so much! 🙂
What did you use to cut the Lego base so cleanly?
We used a bandsaw and a grinding wheel. You could also use a hacksaw or a Dremel tool
Very cool DIY I will have to try this myself one day it might have to be a little while thou my little one is 2 I’m not sure if she would try to eat legos or not right now I might wait until she is 3 or 4 but very very cool DIY.
Thanks Brittany!